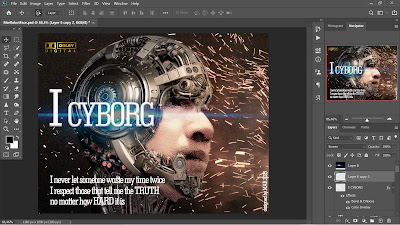
With the development of digital art that is happening nowadays, it is very possible for everyone to explore their imagination into an image. One of the software that is very popular in digital art is photoshop. Through photoshop we can change into anything according to our wishes.
This is why I tried to create a picture of myself with a cyborg's head. I had my imagination transform into a cyborg dimension with the appropriate visual effect. The image above is an image that I created with a multi-layer technique using the effect from photoshop. The image is a combination of 3 main images, i.e.: (1) the image of sparks as the background, the original image can be found here, (2) the man, I used my own photo as a model (of course you can use your own photo as a model), and (3) a picture of the cyborg's head, the original image. can be found here.
How do I create the image above? The steps and methods that I use briefly are as follows:
- The image size I use is 1,280 px: 1,000 px with an image resolution of 300 ppi
- Place the sparks on the background, then adjust the size according to the image size used
- Place the man model image just above the sparks layer, then create a layer mask to remove the background of the man image
- Match the image of the man to the background image by making curve, level, and brightness & contrast effects, respectively, as a clipping mask. This adjustment is made in order to obtain a darker image effect.
- Place the cyborg head image as the top layer, with blend mode is multiply (opacity 100%), then create a layer mask to remove the background image
- Still on the layer mask position, hide parts of the cyborg's face so that the ma face appears
- Adjust the structure of the cyborg face shape with the man face (use Ctrl + T) and select warp mode, adjust it by shifting certain points of the cyborg's face until it looks right with the man face.
- Match the image of the cyborg's face to the background and man images by making curve, level, and brightness & contrast effects, respectively, as a clipping mask. This adjustment is made in order to obtain a darker image effect.
- Double click on the cyborg face image to enter the layer style, and create a bevel and emboss effect, then adjust it to make it look more realistic.
- Duplicate the cyborg face image that has been adjusted both in structure and effect (curve, level, brightness & contrast), change the blend mode to screen (opacity 100%)
- To make the sparks on the background look more realistic, create a new layer with the blend mode overlay (opacity 66%), then use the brush tools with an orange color, adjusting the structure of the sparks.
- Make a new layer to make the bottom image gradient look darker
- Use a coloring effect with vibrance (saturation -32, vibrance 0)
- Use picture effects (curve, level, and brightness & contrast effects) each according to your imagination
- For I Cyborg sentences, use text tools, choose the type, color, and font size according to your imagination. Then change the sentence text to rasterize type, double-click it to give it a bevel and emboss effect, and a color overlay.
- To add a visual effect to the sentence I cyborg, place the blue light image (the original image of blu light can be found here) above the sentence layer, with the blend mode I used is screen (opacity 48%)
- In order for the image to be impressed as a movie poster, place the dolby logo image (the original image of dolby logo can be found here) with the blend is screen (opacity 100%)
- You can add a few quotes to the image
- The final stage is to readjust some of the effects so that the image looks realistic.
That's my imaginary adventure to become a cyborg that I created through digital art using Photoshop ... beyond imagination... enjoy
« Prev Post
Next Post »

