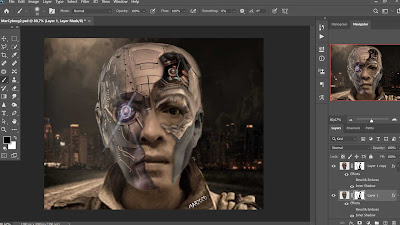
I usually do digital painting on the weekends, because at that time I have more free time. In this post, I am presenting one of the digital arts that I have created. The picture I created shows I have a robot face while still showing my real face. Of course, this image is generated through multi-layer editing and several effects using photoshop.
How do I create the image? The following is a brief explanation of the stages of making the image:
- The image is a combination of 4 different images, namely: (1) dark city as the background image, the original image can be found here, (2) the man, of course, it is me, (3) robot face, the original image can be found here, and (4) a series of wires embedded in the head, the original image of which can be found here.
- The image size I use is 1280 px X 1000 px, with an image resolution of 300 ppi
- Image of the dark city as a background, by doing the clipping mask technique, give a curve effect to produce a darker background image;
- Place the image of the man in a position above the background layer, create a layer mask for cropping the man and while blending it with the face of the robot;
- Place the wiring harness in a position above the man image layer, use blend mode screen with opacity 100%
- Make a duplicate of the wiring circuit, change the blend mode to multiply with an opacity of 29%.
- Place the robot face image on top of the wire circuit image layer, then give it an inner shadow effect
- Make a duplicate of the robot face that has been given the inner shadow effect, change the blend mode to multiply with opacity 51%.
- Combine the three images (the man, wiring, robot face) using each layer mask until it looks realistic. This stage greatly affects the final image that will be created, so it takes our accuracy and our imagination. Of course, this will be different ways and imagination of each person.
- After the process of blending the image is like the step above, the next step is to create a new layer for the effect of the rays coming out of the robot's eye. Use filter - render - lens flare - lens type, I use lens effect type 50 - 300 mm Zoom with 100 brightness
- For the light effect image use blend mode screen with opacity 63%
- Add a color gradient effect so that the blended image looks real with a blend mode screen opacity of 8%
- Add the coloring effect with vibrance (vibrance 0, saturation -30)
- Add a photo filter effect, select a warming filter (85) with a density of 22% then tick preserve luminosity.
- Give the final touch so that the resulting image looks realistic. This stage really depends on the imagination and creativity of each person.
That is the brief explanation that I can give in this post, please be creative and imagine to pamper our right brain ... enjoy
Previous
« Prev Post
« Prev Post
Next
Next Post »
Next Post »

